PROCEDURE WITH PICS
Video of LEG WINDING & Other useful things
COUPLING UP - When Trailers Bite Back
ARTIC UN/COUPLE PROCEDURE for the DSA test.
Included are references to the pics in Dieseldave’s post above 
The usual time to do this is after the road drive and on the reversing area — the examiner will inform you where to park and you will stop in a straight line. A lot [of test candidates] ask the examiner if whether they have passed at this point because they feel that doing the un-couple & couple-up procedure is just wasting time if they have already failed — this is acceptable to the examiner.
Not every instructor teaches this exactly the same way but there will not be much difference. For ease, I have divided this into three stages. 1, the uncouple, 2, the trailer check and 3, the couple up. I always get my trainees to do a complete circuit of the lorry.
Stage one — the uncouple.
Switch off engine and exit cab with the keys and some gloves.
The word is B.L.A.C.K.
B = brake
L = legs
A = airlines (and electrics)
C = clip
K = kingpin (coupling locking device)
Mothertrucker:
Good one - although I always use BLANK
Brake
Legs
Airlines
Number plate
Kingpin (which includes clip)
Apply trailer (B)rake. There are usually two pull devices and only one is the brake — the other is the shunt. Your instructor will show you, which is which as not all are set up the same or located in the same place on each trailer.
Wind down the (L)egs until the lowest leg touches the floor and then do one wind back with the handle and stow it in the holder. This prevents a big BANG as you pull the unit out and on the couple up, if the unit is not perfectly lined up with the trailer, it lets the trailer “float” so the legs do not gouge the floor — the DSA do not like their reverse area having chunks of tarmac missing!
There are two aspects to the winding handle set up, the spigot and the handle. The spigot has 3 settings. Pulled fully out for normal windup & down, pushed fully in for super slow wind up & down and the middle of the two, which does nothing. The winding handle is used to pull or push the spigot. So, for normal winding down of the legs, pull the spigot fully out with the handle and then gently slide the handle back in along the spigot without pushing the spigot back in — this will now allow you to wind down the legs with one hand as the handle is locked along the spigot.
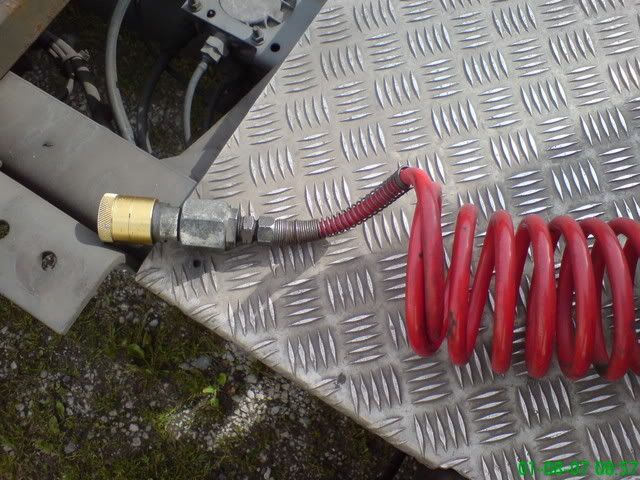
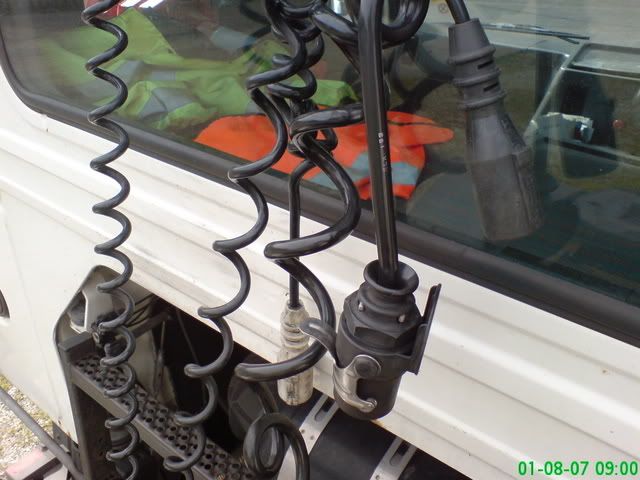
Now the (A)irlines & electric connections need to be detached from the trailer and properly stowed onto the holders on the back of the unit. On my set up there are 2 airlines and 3 electric ones. The red airline (see pic 4) is detached by turning the collar until the groove in it lines up with the little spigot, then pull the collar so the groove slots into the spigot and the red line will now release. The yellow airline (see pic 5) also has a collar and a groove, which will line up with a spigot, but this time the collar is pushed into the spigot to release it.
Two of the electric lines just pull out but the ABS electric line has a ‘trigger’ to pull underneath it (see pic 6) so it can release — this ‘trigger’ needs to be pushed forward to connect it properly onto the housing for it on the back of the unit.
Most units have steps to get up onto the back of the unit — use them and get down the same way — do not jump off — it’s very hard to carry on with a twisted ankle or worse!
At this point, all the work has been done on the nearside of the set up I use, so I now get the trainee to walk around the back of the trailer to get to the clip. Whilst passing the rear, they say, “remove number plate” to the examiner.
The (C)lip is a safety device that stops the kingpin handle from being pulled out. This is the bit where you usually get muck & grease etc on you!
Reach under the body of the trailer, above the rear unit axle and squeeze the lower part of the clip so that the top bit can be pushed up and out of the hole that it is slotted into. If you have a place to stow the clip, which is usually on a chain attached to the unit, then do so — it makes it easier to find on the couple up.
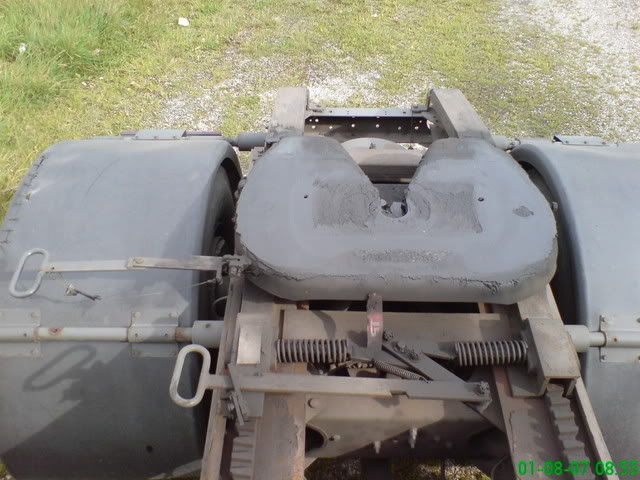
The (K)ingpin handle is now ready to be pulled out and is done by pulling it slightly forward and then fully out (two hands if struggling) with a slight back pull to lock it out. Do not mix up the kingpin handle with the plate slider handle (see pic 1) if your set up has one — your instructor will show you which is which.
Get back into the cab and engage a low gear to pull the unit from under the trailer, taking care not to drop the trailer the last inch, due to the legs not quite touching the floor, when the fifth wheel plate tilts up from the front of the trailer body.
Park the unit parallel to the side of the trailer, facing forward — the examiner might tell you which side to put it.
Stage two — the trailer check.
The examiner will ask you to pick up the trailer and to pretend that you have never seen this trailer before.
Get out of cab with keys and gloves.
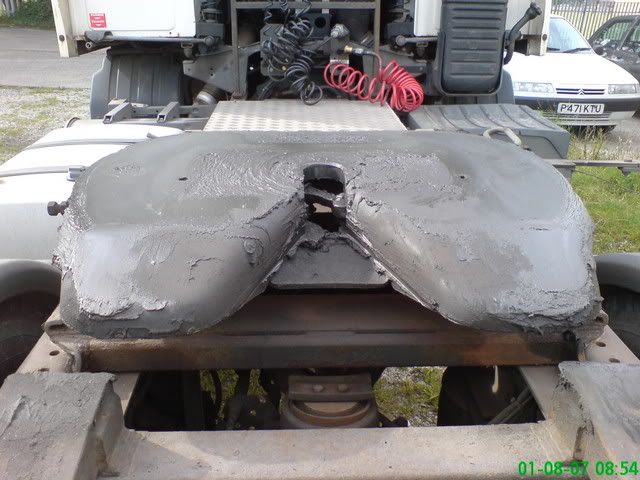
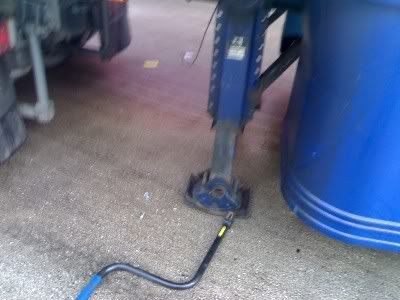
Do a complete trailer check, just like the one you did before setting out in the morning, body, reflectors, doors, tyres, nuts etc, etc, with the addition of the fifth wheel pin check (see pic 3) as they may be a pin lock on it or something might be wrapped around it . Is the trailer MOT in date? Are the connectors for the air and electric lines damaged? On the walk around trailer check, tell the examiner what you are looking at, or touch (hence the gloves) all the areas that you are checking. That way, the examiner can see what you have checked.
MAKE SURE THE EXAMINER SEES YOU CHECK THE TRAILER BRAKE IS ON BY GIVING THE BUTTON A PULL.
Now, get back into the unit and whilst going forward in front of the trailer line up using both mirrors. Reverse towards the front of the trailer using both mirrors to line it up ( you should be able to see the same amount of trailer in each mirror as you do so ) and stop as close as possible without going underneath. Leaving the engine running (seems to be the accepted practice at this point as it is only going to be for a moment) get out of the cab and check that the fifth wheel plate will go just under the trailer (I get my trainees to do this with a flat hand, palm down gesture) and then lightly touch the fifth wheel handle to show that you know it is still out (has been known for some to spring back in!), then get back into the cab and proceed to reverse under the trailer.
You will feel and hear the locking of the unit to the trailer but to check that it is locked, engage a low forward gear and gently try TWICE to pull out.
Apply handbrake.
Stage three — the couple up.
Get out of cab with keys and gloves.
The word is K.C.A.L.B. (BLACK backwards) The (K)ingpin is already sorted — that locked in at the end of stage two.
Put the (C)lip back into the hole you took it out of on the uncouple.
Attach the (A)irlines and electrical connections. They are designed to fit only in their designated slots — you cannot fit them into the wrong one. The red airline is the hard one as there is air pressure to push against — a lot of trainees get their bum against the rear of the unit for extra leverage. The collars and pins of the airlines have to be lined up and slotted in for the airlines to fit onto their respective housings. Once connected, give the collars a twist for safety, so they are not left in line with the pins.
Wind up the (L)egs and stow the handle.
Release the trailer (B)rake.
Walk to the rear of the trailer and say to the examiner “number plate on and please would you check my trailer lights.”
Calmly, and whilst walking slowly back to your cab, check that you have done everything— Kingpin, Clip, Airlines etc, Legs, Brake & number plate■■?
Start engine, switch on dipped headlights and rear foglight(s) then do a separate indicator check (not hazards) and finishing with brake lights. Then, switch off all lights and the vehicle engine, and wait for the examiner to get back into the cab with you, where you will hear those nice words “I am happy to tell you that you have passed.”