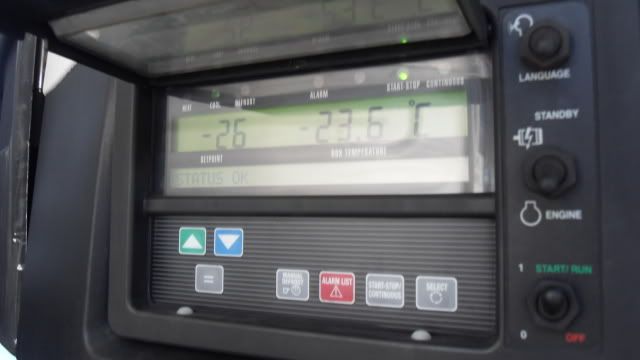
From time to time, somebody asks how to use the controls of a fridge trailer, so while I’ve got 10 minutes I’ll try to give a brief overview. If I miss anything others can add to it.
This is a Carrier fridge, but they are all broadly similar.

The switch on the bottom right turns it on and off. When you turn it on it will self-check. This takes about 30 seconds. The warning buzzer will sound for 5 seconds and then the fridge motor will start.
The switch above that says engine/standby. This is set to “engine” when in normal use, and to “standby” when it is running on a plug-in, e.g. on a ferry.
The figure on the left, -26 is what it is set at. The figure on the right, -23.6 is what the box temperature actually is at the time.
To alter the set temperature, use the green/blue up and down arrows, this will change the figure on the left. When you reach the desired temperature, push the = button beneath the arrows and the display will briefly show “setpoint changed”.
There is a stop/start- continuous button. This broadly does what it says, changes the operating mode. Some loads need to be on continuous running, mostly delicate fruits, otherwise I generally set it to stop/start, which saves fuel. You can see from the green LED that it is currently set to stop/start.
There is a “manual defrost” button, although you don’t normally need to use that as it auto-defrosts as part of the running cycle.
The red button brings up any fault codes although generally you don’t need to use this. In the picture above, you can see “Status OK” on the display, this is what it should read if working properly.
Hope this is of help to someone, perhaps when the question next gets asked the questioner can be directed towards this thread, and if anyone wants to add anything I’ve missed, feel free.